

如何在YOLOv8网络中添加自定义注意力机制
在目标检测任务中,加入注意力机制可以提升模型的检测效果。本文将介绍如何在YOLOv8模型中集成多种注意力机制,如 SimAM、ShuffleAttention、TripletAttention、MHSA、CBAM 和 EMA,以增强模型对图像特征的提取能力。我们将展示每个注意力机制的代码示例,并讨论如何将这些模块添加到YOLOv8网络中。
目录
- 1. 注意力机制示例代码
- 1.1 SimAM 模块代码
- 1.2 ShuffleAttention 模块代码
- 1.3 TripletAttention 模块代码
- 1.4 MHSA 模块代码
- 1.5 CBAM 模块代码
- 1.6 EMA 模块代码
- 1.7 ECA 模块代码
- 2. 添加注意力机制的步骤
- 2.1 修改YOLOv8的配置文件
- 2.2 编写自定义注意力机制模块
- 2.3 训练和验证注意力机制
- 3. 总结
1. 注意力机制示例代码
下面介绍六种常用的注意力机制模块,并提供代码示例。每种注意力机制都有其独特的优点,可以根据任务需求选择最适合的机制。
1.1 SimAM 模块代码
SimAM (Simple Attention Module) 是一种轻量级的注意力机制;通过简单的操作实现了注意力机制的效果,适用于对计算资源敏感的项目。它适合那些希望在提升模型性能的同时,尽量减少计算开销的任务,比如嵌入式设备上的实时目标检测。。
import torch
import torch.nn as nn


class SimAM(torch.nn.Module):
    def __init__(self, e_lambda=1e-4):
        super(SimAM, self).__init__()

        self.activaton = nn.Sigmoid()
        self.e_lambda = e_lambda

    def __repr__(self):
        s = self.__class__.__name__ + '('
        s += ('lambda=%f)' % self.e_lambda)
        return s

    @staticmethod
    def get_module_name():
        return "simam"

    def forward(self, x):
        b, c, h, w = x.size()

        n = w * h - 1

        x_minus_mu_square = (x - x.mean(dim=[2, 3], keepdim=True)).pow(2)
        y = x_minus_mu_square / (4 * (x_minus_mu_square.sum(dim=[2, 3], keepdim=True) / n + self.e_lambda)) + 0.5

        return x * self.activaton(y)


# if __name__ == '__main__':
#     input = torch.randn(3, 64, 7, 7)
#     model = SimAM()
#     outputs = model(input)
#     print(outputs.shape)
1.2 ShuffleAttention 模块代码
ShuffleAttention 适合需要全局特征交互的场景;通过通道洗牌操作重新排列特征,确保模型能够在不同通道间传递信息,提升特征的全局表达能力。对于需要处理复杂、具有多样性特征的图像(如交通场景、复杂的自然环境),这种机制能有效提升模型的感知能力。
import torch
from torch import nn
from torch.nn import init
from torch.nn.parameter import Parameter

class ShuffleAttention(nn.Module):

    def __init__(self, channel=512, reduction=16, G=8):
        super().__init__()
        self.G = G
        self.channel = channel
        self.avg_pool = nn.AdaptiveAvgPool2d(1)
        self.gn = nn.GroupNorm(channel // (2 * G), channel // (2 * G))
        self.cweight = Parameter(torch.zeros(1, channel // (2 * G), 1, 1))
        self.cbias = Parameter(torch.ones(1, channel // (2 * G), 1, 1))
        self.sweight = Parameter(torch.zeros(1, channel // (2 * G), 1, 1))
        self.sbias = Parameter(torch.ones(1, channel // (2 * G), 1, 1))
        self.sigmoid = nn.Sigmoid()

    def init_weights(self):
        for m in self.modules():
            if isinstance(m, nn.Conv2d):
                init.kaiming_normal_(m.weight, mode='fan_out')
                if m.bias is not None:
                    init.constant_(m.bias, 0)
            elif isinstance(m, nn.BatchNorm2d):
                init.constant_(m.weight, 1)
                init.constant_(m.bias, 0)
            elif isinstance(m, nn.Linear):
                init.normal_(m.weight, std=0.001)
                if m.bias is not None:
                    init.constant_(m.bias, 0)

    @staticmethod
    def channel_shuffle(x, groups):
        b, c, h, w = x.shape
        x = x.reshape(b, groups, -1, h, w)
        x = x.permute(0, 2, 1, 3, 4)

        # flatten
        x = x.reshape(b, -1, h, w)

        return x

    def forward(self, x):
        b, c, h, w = x.size()
        # group into subfeatures
        x = x.view(b * self.G, -1, h, w)  # bs*G,c//G,h,w

        # channel_split
        x_0, x_1 = x.chunk(2, dim=1)  # bs*G,c//(2*G),h,w

        # channel attention
        x_channel = self.avg_pool(x_0)  # bs*G,c//(2*G),1,1
        x_channel = self.cweight * x_channel + self.cbias  # bs*G,c//(2*G),1,1
        x_channel = x_0 * self.sigmoid(x_channel)

        # spatial attention
        x_spatial = self.gn(x_1)  # bs*G,c//(2*G),h,w
        x_spatial = self.sweight * x_spatial + self.sbias  # bs*G,c//(2*G),h,w
        x_spatial = x_1 * self.sigmoid(x_spatial)  # bs*G,c//(2*G),h,w

        # concatenate along channel axis
        out = torch.cat([x_channel, x_spatial], dim=1)  # bs*G,c//G,h,w
        out = out.contiguous().view(b, -1, h, w)

        # channel shuffle
        out = self.channel_shuffle(out, 2)
        return out


if __name__ == '__main__':
    input = torch.randn(50, 512, 7, 7)
    se = ShuffleAttention(channel=512, G=8)
    output = se(input)
1.3 TripletAttention 模块代码
TripletAttention 适合需要捕捉多方向特征的场景;在通道上引入了三个方向的注意力(水平、垂直、深度),能够帮助模型更好地感知多方向上的特征。这种机制特别适用于那些需要捕捉方向性信息的任务,比如道路标志检测和自然场景理解。
import torch
import torch.nn as nn


class BasicConv(nn.Module):  # https://arxiv.org/pdf/2010.03045.pdf
    def __init__(self, in_planes, out_planes, kernel_size, stride=1, padding=0, dilation=1, groups=1, relu=True,
                 bn=True, bias=False):
        super(BasicConv, self).__init__()
        self.out_channels = out_planes
        self.conv = nn.Conv2d(in_planes, out_planes, kernel_size=kernel_size, stride=stride, padding=padding,
                              dilation=dilation, groups=groups, bias=bias)
        self.bn = nn.BatchNorm2d(out_planes, eps=1e-5, momentum=0.01, affine=True) if bn else None
        self.relu = nn.ReLU() if relu else None

    def forward(self, x):
        x = self.conv(x)
        if self.bn is not None:
            x = self.bn(x)
        if self.relu is not None:
            x = self.relu(x)
        return x


class ZPool(nn.Module):
    def forward(self, x):
        return torch.cat((torch.max(x, 1)[0].unsqueeze(1), torch.mean(x, 1).unsqueeze(1)), dim=1)


class AttentionGate(nn.Module):
    def __init__(self):
        super(AttentionGate, self).__init__()
        kernel_size = 7
        self.compress = ZPool()
        self.conv = BasicConv(2, 1, kernel_size, stride=1, padding=(kernel_size - 1) // 2, relu=False)

    def forward(self, x):
        x_compress = self.compress(x)
        x_out = self.conv(x_compress)
        scale = torch.sigmoid_(x_out)
        return x * scale


class TripletAttention(nn.Module):
    def __init__(self, no_spatial=False):
        super(TripletAttention, self).__init__()
        self.cw = AttentionGate()
        self.hc = AttentionGate()
        self.no_spatial = no_spatial
        if not no_spatial:
            self.hw = AttentionGate()

    def forward(self, x):
        x_perm1 = x.permute(0, 2, 1, 3).contiguous()
        x_out1 = self.cw(x_perm1)
        x_out11 = x_out1.permute(0, 2, 1, 3).contiguous()
        x_perm2 = x.permute(0, 3, 2, 1).contiguous()
        x_out2 = self.hc(x_perm2)
        x_out21 = x_out2.permute(0, 3, 2, 1).contiguous()
        if not self.no_spatial:
            x_out = self.hw(x)
            x_out = 1 / 3 * (x_out + x_out11 + x_out21)
        else:
            x_out = 1 / 2 * (x_out11 + x_out21)
        return x_out
1.4 MHSA 模块代码
MHSA (Multi-Head Self-Attention) 是常用于Transformer模型的注意力机制,适合大规模上下文建模的场景;通过多头自注意力的机制,能够帮助模型捕捉图像中的长距离依赖关系。它在需要处理上下文信息的任务中表现出色,如自然场景中的多物体检测。对于需要全局信息并且图像内物体之间具有复杂相互关系的任务,MHSA 是理想的选择。
import torch
import torch.nn as nn

class MHSA(nn.Module):
    def __init__(self, n_dims, width=14, height=14, heads=4, pos_emb=False):
        super(MHSA, self).__init__()

        self.heads = heads
        self.query = nn.Conv2d(n_dims, n_dims, kernel_size=1)
        self.key = nn.Conv2d(n_dims, n_dims, kernel_size=1)
        self.value = nn.Conv2d(n_dims, n_dims, kernel_size=1)
        self.pos = pos_emb
        if self.pos:
            self.rel_h_weight = nn.Parameter(torch.randn([1, heads, (n_dims) // heads, 1, int(height)]),
                                             requires_grad=True)
            self.rel_w_weight = nn.Parameter(torch.randn([1, heads, (n_dims) // heads, int(width), 1]),
                                             requires_grad=True)
        self.softmax = nn.Softmax(dim=-1)

    def forward(self, x):
        n_batch, C, width, height = x.size()
        q = self.query(x).view(n_batch, self.heads, C // self.heads, -1)
        k = self.key(x).view(n_batch, self.heads, C // self.heads, -1)
        v = self.value(x).view(n_batch, self.heads, C // self.heads, -1)
        content_content = torch.matmul(q.permute(0, 1, 3, 2), k)  # 1,C,h*w,h*w
        c1, c2, c3, c4 = content_content.size()
        if self.pos:
            content_position = (self.rel_h_weight + self.rel_w_weight).view(1, self.heads, C // self.heads, -1).permute(
                0, 1, 3, 2)  # 1,4,1024,64

            content_position = torch.matmul(content_position, q)  # ([1, 4, 1024, 256])
            content_position = content_position if (
                    content_content.shape == content_position.shape) else content_position[:, :, :c3, ]
            assert (content_content.shape == content_position.shape)
            energy = content_content + content_position
        else:
            energy = content_content
        attention = self.softmax(energy)
        out = torch.matmul(v, attention.permute(0, 1, 3, 2))  # 1,4,256,64
        out = out.view(n_batch, C, width, height)
        return out

# if __name__ == '__main__':
#     input = torch.randn(50, 512, 7, 7)
#     mhsa = MHSA(n_dims=512)
#     output = mhsa(input)
#     print(output.shape)
1.5 CBAM 模块代码
CBAM(Convolutional Block Attention Module)适合需要结合通道和空间特征的场景;通过结合通道注意力和空间注意力,帮助网络更加精准地捕捉图像中的关键区域。它适用于大多数目标检测任务,特别是当需要细化某些特定物体的检测时,比如在自动驾驶中的行人检测或交通标志检测。
import torch
from torch import nn

class ChannelAttention(nn.Module):
    # Channel-attention module https://github.com/open-mmlab/mmdetection/tree/v3.0.0rc1/configs/rtmdet
    def __init__(self, channels: int) -> None:
        super().__init__()
        self.pool = nn.AdaptiveAvgPool2d(1)
        self.fc = nn.Conv2d(channels, channels, 1, 1, 0, bias=True)
        self.act = nn.Sigmoid()

    def forward(self, x: torch.Tensor) -> torch.Tensor:
        return x * self.act(self.fc(self.pool(x)))


class SpatialAttention(nn.Module):
    # Spatial-attention module
    def __init__(self, kernel_size=7):
        super().__init__()
        assert kernel_size in (3, 7), 'kernel size must be 3 or 7'
        padding = 3 if kernel_size == 7 else 1
        self.cv1 = nn.Conv2d(2, 1, kernel_size, padding=padding, bias=False)
        self.act = nn.Sigmoid()

    def forward(self, x):
        return x * self.act(self.cv1(torch.cat([torch.mean(x, 1, keepdim=True), torch.max(x, 1, keepdim=True)[0]], 1)))


class CBAM(nn.Module):
    # Convolutional Block Attention Module
    def __init__(self, c1, kernel_size=7):  # ch_in, kernels
        super().__init__()
        self.channel_attention = ChannelAttention(c1)
        self.spatial_attention = SpatialAttention(kernel_size)

    def forward(self, x):
        return self.spatial_attention(self.channel_attention(x))
1.6 EMA 模块代码
EMA(Efficient Multi-Head Attention)适合希望在多头自注意力中提升效率的场景;它通过减少计算复杂度而提升性能,适用于大规模数据集的训练。它在保持注意力机制强大的特征捕捉能力的同时,还能显著降低计算成本,适合高性能要求的任务场景。
import torch
from torch import nn

class EMA(nn.Module):
    def __init__(self, channels, c2=None, factor=32):
        super(EMA, self).__init__()
        self.groups = factor
        assert channels // self.groups > 0
        self.softmax = nn.Softmax(-1)
        self.agp = nn.AdaptiveAvgPool2d((1, 1))
        self.pool_h = nn.AdaptiveAvgPool2d((None, 1))
        self.pool_w = nn.AdaptiveAvgPool2d((1, None))
        self.gn = nn.GroupNorm(channels // self.groups, channels // self.groups)
        self.conv1x1 = nn.Conv2d(channels // self.groups, channels // self.groups, kernel_size=1, stride=1, padding=0)
        self.conv3x3 = nn.Conv2d(channels // self.groups, channels // self.groups, kernel_size=3, stride=1, padding=1)

    def forward(self, x):
        b, c, h, w = x.size()
        group_x = x.reshape(b * self.groups, -1, h, w)  # b*g,c//g,h,w
        x_h = self.pool_h(group_x)
        x_w = self.pool_w(group_x).permute(0, 1, 3, 2)
        hw = self.conv1x1(torch.cat([x_h, x_w], dim=2))
        x_h, x_w = torch.split(hw, [h, w], dim=2)
        x1 = self.gn(group_x * x_h.sigmoid() * x_w.permute(0, 1, 3, 2).sigmoid())
        x2 = self.conv3x3(group_x)
        x11 = self.softmax(self.agp(x1).reshape(b * self.groups, -1, 1).permute(0, 2, 1))
        x12 = x2.reshape(b * self.groups, c // self.groups, -1)  # b*g, c//g, hw
        x21 = self.softmax(self.agp(x2).reshape(b * self.groups, -1, 1).permute(0, 2, 1))
        x22 = x1.reshape(b * self.groups, c // self.groups, -1)  # b*g, c//g, hw
        weights = (torch.matmul(x11, x12) + torch.matmul(x21, x22)).reshape(b * self.groups, 1, h, w)
        return (group_x * weights.sigmoid()).reshape(b, c, h, w)
1.7 ECA 模块代码
ECA(Efficient Channel Attention)适合需要高效通道注意力的场景;通过消除全连接层,使用1D卷积进行局部交互,大大减少了参数量,同时仍然保留了通道注意力的能力。它适合那些对计算资源有限制的场景,比如移动设备上进行目标检测的任务。
import torch
from torch import nn

class ECA(nn.Module):
    def __init__(self, channels: int, k_size: int = 3):
        super(ECA, self).__init__()
        self.avg_pool = nn.AdaptiveAvgPool2d(1)
        self.conv = nn.Conv1d(1, 1, kernel_size=k_size, padding=(k_size - 1) // 2, bias=False)
        self.sigmoid = nn.Sigmoid()

    def forward(self, x):
        # Apply global average pooling
        y = self.avg_pool(x)

        # Reshape and apply 1D convolution
        y = self.conv(y.squeeze(-1).transpose(-1, -2)).transpose(-1, -2).unsqueeze(-1)

        # Apply sigmoid activation and element-wise multiplication
        return x * self.sigmoid(y)
2. 添加注意力机制的步骤
2.1 修改YOLOv8的配置文件
我们可以通过在YOLOv8配置文件中指定使用注意力机制,以下是如何在第10层加入注意力机制的配置示例,以ShuffleAttention注意力机制为例,用到哪个放开哪个:
# Ultralytics YOLO 🚀, AGPL-3.0 license
# YOLOv8 object detection model with P3-P5 outputs. For Usage examples see https://docs.ultralytics.com/tasks/detect

# Parameters
nc: 81 # number of classes
scales: # model compound scaling constants, i.e. 'model=yolov8n.yaml' will call yolov8.yaml with scale 'n'
  # [depth, width, max_channels]
  n: [0.33, 0.25, 1024] # YOLOv8n summary: 225 layers,  3157200 parameters,  3157184 gradients,   8.9 GFLOPs
  s: [0.33, 0.50, 1024] # YOLOv8s summary: 225 layers, 11166560 parameters, 11166544 gradients,  28.8 GFLOPs
  m: [0.67, 0.75, 768] # YOLOv8m summary: 295 layers, 25902640 parameters, 25902624 gradients,  79.3 GFLOPs
  l: [1.00, 1.00, 512] # YOLOv8l summary: 365 layers, 43691520 parameters, 43691504 gradients, 165.7 GFLOPs
  x: [1.00, 1.25, 512] # YOLOv8x summary: 365 layers, 68229648 parameters, 68229632 gradients, 258.5 GFLOPs

# YOLOv8.0n backbone
backbone:
  # [from, repeats, module, args]
  - [-1, 1, Conv, [64, 3, 2]] # 0-P1/2
  - [-1, 1, Conv, [128, 3, 2]] # 1-P2/4
  - [-1, 3, C2f, [128, True]]
  - [-1, 1, Conv, [256, 3, 2]] # 3-P3/8
  - [-1, 6, C2f, [256, True]]
  - [-1, 1, Conv, [512, 3, 2]] # 5-P4/16
  - [-1, 6, C2f, [512, True]]
  - [-1, 1, Conv, [1024, 3, 2]] # 7-P5/32
  - [-1, 3, C2f, [1024, True]]
  - [-1, 1, SPPF, [1024, 5]] # 9
#  - [-1, 1, SimAM, [1024]] # 10
  - [-1, 1, ShuffleAttention, [16, 8]] # 10
#  - [-1, 1, TripletAttention, [1024]]
#  - [-1, 1, MHSA, [14, 14, 4]] # 10
#  - [-1, 1, CBAM, [1024]] # 10
#  - [-1, 1, EMA, [1024, 8]] # 10
#  - [-1, 1, ECA, [1024]]  # 10

# YOLOv8.0n head
head:
  - [-1, 1, nn.Upsample, [None, 2, "nearest"]]
  - [[-1, 6], 1, Concat, [1]] # cat backbone P4
  - [-1, 3, C2f, [512]] # 13

  - [-1, 1, nn.Upsample, [None, 2, "nearest"]]
  - [[-1, 4], 1, Concat, [1]] # cat backbone P3
  - [-1, 3, C2f, [256]] # 16 (P3/8-small)

  - [-1, 1, Conv, [256, 3, 2]]
  - [[-1, 13], 1, Concat, [1]] # cat head P4
  - [-1, 3, C2f, [512]] # 19 (P4/16-medium)

  - [-1, 1, Conv, [512, 3, 2]]
  - [[-1, 10], 1, Concat, [1]] # cat head P5
  - [-1, 3, C2f, [1024]] # 22 (P5/32-large)

  - [[16, 19, 22], 1, Detect, [nc]] # Detect(P3, P4, P5) ShuffleAttention
2.2 编写自定义注意力机制模块
为了在YOLOv8中集成自定义的注意力机制模块,我们需要将相应的注意力机制代码文件(如 SimAM.py、ShuffleAttention.py、TripletAttention.py、MHSA.py、CBAM.py、EMA.py、ECA.py)放入项目中的 ultralytics/nn/ 目录下,并在 task.py 文件中进行相应的导入和修改。
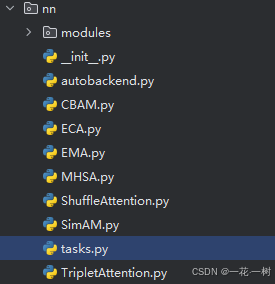
步骤 1:将注意力机制模块文件放入 ultralytics/nn/ 目录
首先,确保所有注意力机制模块的代码文件都放在 ultralytics/nn/ 目录下。注意力机制模块的文件名如下:
SimAM.pyShuffleAttention.pyTripletAttention.pyMHSA.pyCBAM.pyEMA.pyECA.py
如图是我的目录:
步骤 2:在 task.py 中导入注意力机制模块
接下来,在 ultralytics/nn/tasks.py 文件的头部导入这些注意力机制模块。添加以下代码:
from ultralytics.nn.MHSA import MHSA
from ultralytics.nn.ShuffleAttention import ShuffleAttention
from ultralytics.nn.SimAM import SimAM
from ultralytics.nn.CBAM import CBAM
from ultralytics.nn.TripletAttention import TripletAttention
from ultralytics.nn.EMA import EMA
from ultralytics.nn.ECA import ECA
步骤 3:在 task.py 的 910 行到950行任意位置添加注意力机制的构建逻辑
在 task.py 文件中的约 910 行到950行的位置,添加代码逻辑以确保这些注意力机制模块在网络中正确初始化。可以参考以下代码:
## 添加注意力机制
elif m in {MHSA, ShuffleAttention}:
    args = [ch[f], *args]
elif m in {EMA}:
    args = [ch[f]]
elif m in (SimAM, CBAM, TripletAttention, ECA):
    c1, c2 = ch[f], args[0]
    if c2 != nc:
        c2 = make_divisible(min(c2, max_channels) * width, 8)
    args = [c1, *args[1:]]
如图是我添加的位置:
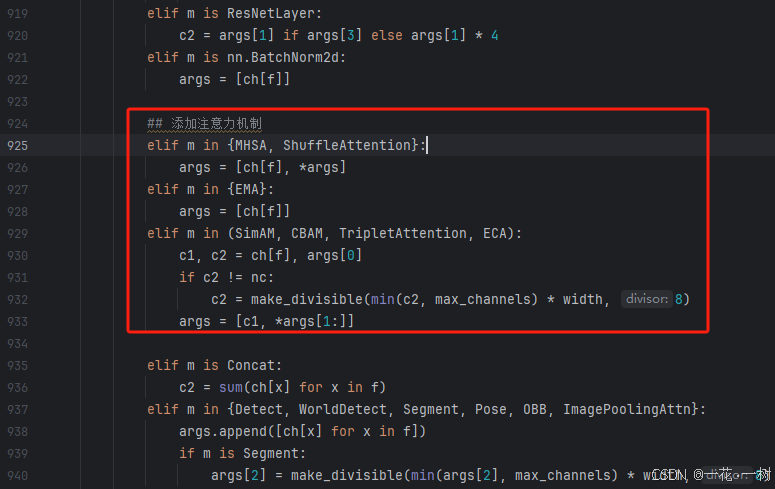
此代码块确保在网络结构中正确处理和初始化各类注意力机制。
小结
通过上述步骤,我们可以成功将自定义的注意力机制集成到YOLOv8中。在 task.py 中导入相应模块并添加初始化逻辑后,您可以通过修改配置文件来选择使用哪种注意力机制,并在训练过程中验证其效果。
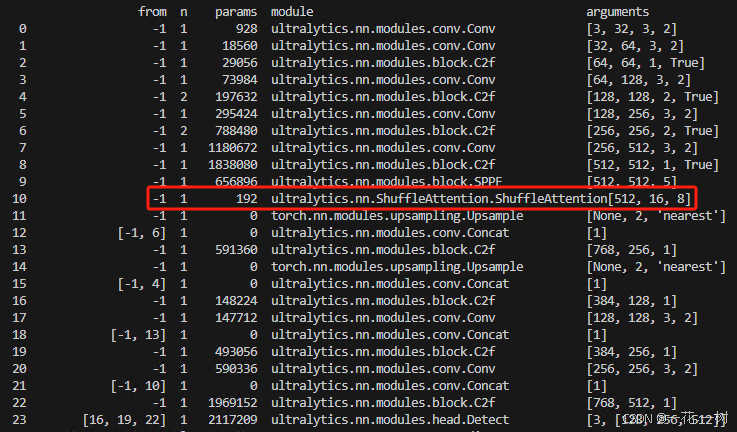
2.3 训练和验证注意力机制
使用修改后的配置文件进行训练(我修改后的配置文件是yolov8_att.yaml),运行训练代码时候用yolov8s_att.yaml,其中的yolov8后面加了一个s,证明使用s网络训练;查看日志输出,能够看到类似如下红框的输出,证明 ShuffleAttention 已成功加载,其他注意力机制类似:
from ultralytics import YOLO

if __name__ == '__main__':
    model = YOLO("yolov8s_att.yaml").load("yolov8s.pt")  # build from YAML and transfer weights

    # Train the model
    results = model.train(data=r"traffic_signage.yaml", epochs=150, batch=16, imgsz=1280)
如何将注意力机制应用到项目中?
在实际项目中,不同的注意力机制具有不同的侧重点,适用于不同的任务场景。根据项目的具体需求,选择合适的注意力机制可以大大提升模型的表现。:
- 轻量模型优化:如果你的项目目标是提升模型的实时性并在嵌入式设备上运行,可以选择
SimAM或ECA这样的轻量级注意力机制。 - 大规模场景建模:对于涉及复杂背景的目标检测任务,
MHSA或CBAM可以有效增强模型对全局特征的捕捉能力。 - 多目标检测:当你的项目涉及复杂的多目标检测场景(如自动驾驶中的多物体检测),可以尝试使用
ShuffleAttention或TripletAttention,它们在捕捉多方向和通道交互特征方面表现出色。 - 计算效率优化:如果你关注模型的计算效率,可以选择
EMA来在保持高性能的同时减少计算开销。
通过合理选择和应用这些注意力机制,能够为目标检测、分类和语义分割等任务带来显著的性能提升。
3. 总结
本文详细介绍了六种常见的注意力机制,并展示了如何将它们集成到YOLOv8网络中。通过添加注意力机制,模型可以更好地捕捉图像中的重要信息,从而提升目标检测性能。